Roq the basics
| If you find any issue or missing info, be awesome and edit this document to help others Roqers. |
By default, your site files should be located in the project root directory (or in the Java resources dir: src/main/resources/).
Directory Structure
The default directory structure is:
my-site/
├── data/                                (1)
│   ├── menu.yml
│   └── tags.yml
│
├── content/                             (2)
│   ├── posts/                           (3)
│   │   ├── 2024-10-14-roq-ssg/
│   │   │   ├── index.md
│   │   │   └── image.jpg
│   │   └── 2024-10-20-heart-roq.md
│   │
│   ├── roq-page.md                      (4)
│   └── index.html                       (5)
│
├── public/                              (6)
│   └── style.css
│
└── templates/                           (7)
    ├── partials/                        (8)
    │   ├── head.html
    │   └── pagination.html
    │
    └── layouts/                         (9)
        ├── base.html
        ├── page.html
        └── post.html
└── pom.xml (10)| 1 | Roq Data Files
The data/ directory contains data files like menu.yml and tags.yml. These files can hold structured data used across the site. |
| 2 | Content Files
The content/ directory is where all content of the site that will be generated as pages resides (.html, .md, .adoc*, .json, .xml, …) |
| 3 | Collections
The posts/ directory is the default collection in Roq, it is optional. It holds content files for blog posts or similar structured documents. You can configure multiples collections (recipes, events, …). |
| 4 | Additional pages
You may provide additional pages files like roq-page.md outside a collection. You can also use sub-directories which will be part of the resulting path. |
| 5 | Index File
The index.html file is required and serves as the homepage. It provides site-wide data using FrontMatter. |
| 6 | Static Files
The public/ directory holds static files, such as images, CSS, or JavaScript files. These files will not be processed. |
| 7 | Templates
The templates/ directory is optional as templates can be provided by a theme. It contains Qute templates for partials and layouts. |
| 8 | Qute Partials
The partials/ directory contains reusable Qute template fragments, such as head.html and pagination.html, which can be included in layouts. |
| 9 | Layouts
The layouts/ directory defines the structure for pages and documents. For example:
|
| 10 | Build files
The build file such as a pom.xml is needed to configure the build. It contains dependencies for your site such as theme and plugins. |
Qute and FrontMatter
All templates may use the awesome type-safe Qute template engine.
|
Type-safety doesn’t make it more complex—it just means that using wrong variables will result in a build error. This prevents issues from leaking into production. |
Templates for layouts, documents, and pages may also declare a FrontMatter (FM) header, delimited by two ---.
This header contains YAML data used to configure things like:
-
Routing
-
Data for templates
-
Content generation
-
Pagination
For example, a page template blog-post.html might start with:
---
title: "My First Blog Post"
date: 2025-09-08
author: "Andy"
layout: post
tags: qute, roq, tutorial
---

**Hello World**
Content
The content/ directory contains the site index page and all the Pages and Collections (such as blog posts). It may also contain attached static files (Page attached static files).
Content templates can be written in html, json, yaml, yml, or xml or using Markup languages.
| We sometimes refer to pages in collections as documents, documents are just a special kind of pages. |
Templates (Layouts, Partials, and User Tags)
Layouts, partials, and user tags are templates and must use one of the following extensions:
html, xhtml, htm, json, yaml, yml, or xml.
INFO: .md and .adoc files are not parsed as templates. Instead, you can use markup inside templates through Qute sections {#md} and {#adoc}, provided the corresponding plugins are available.
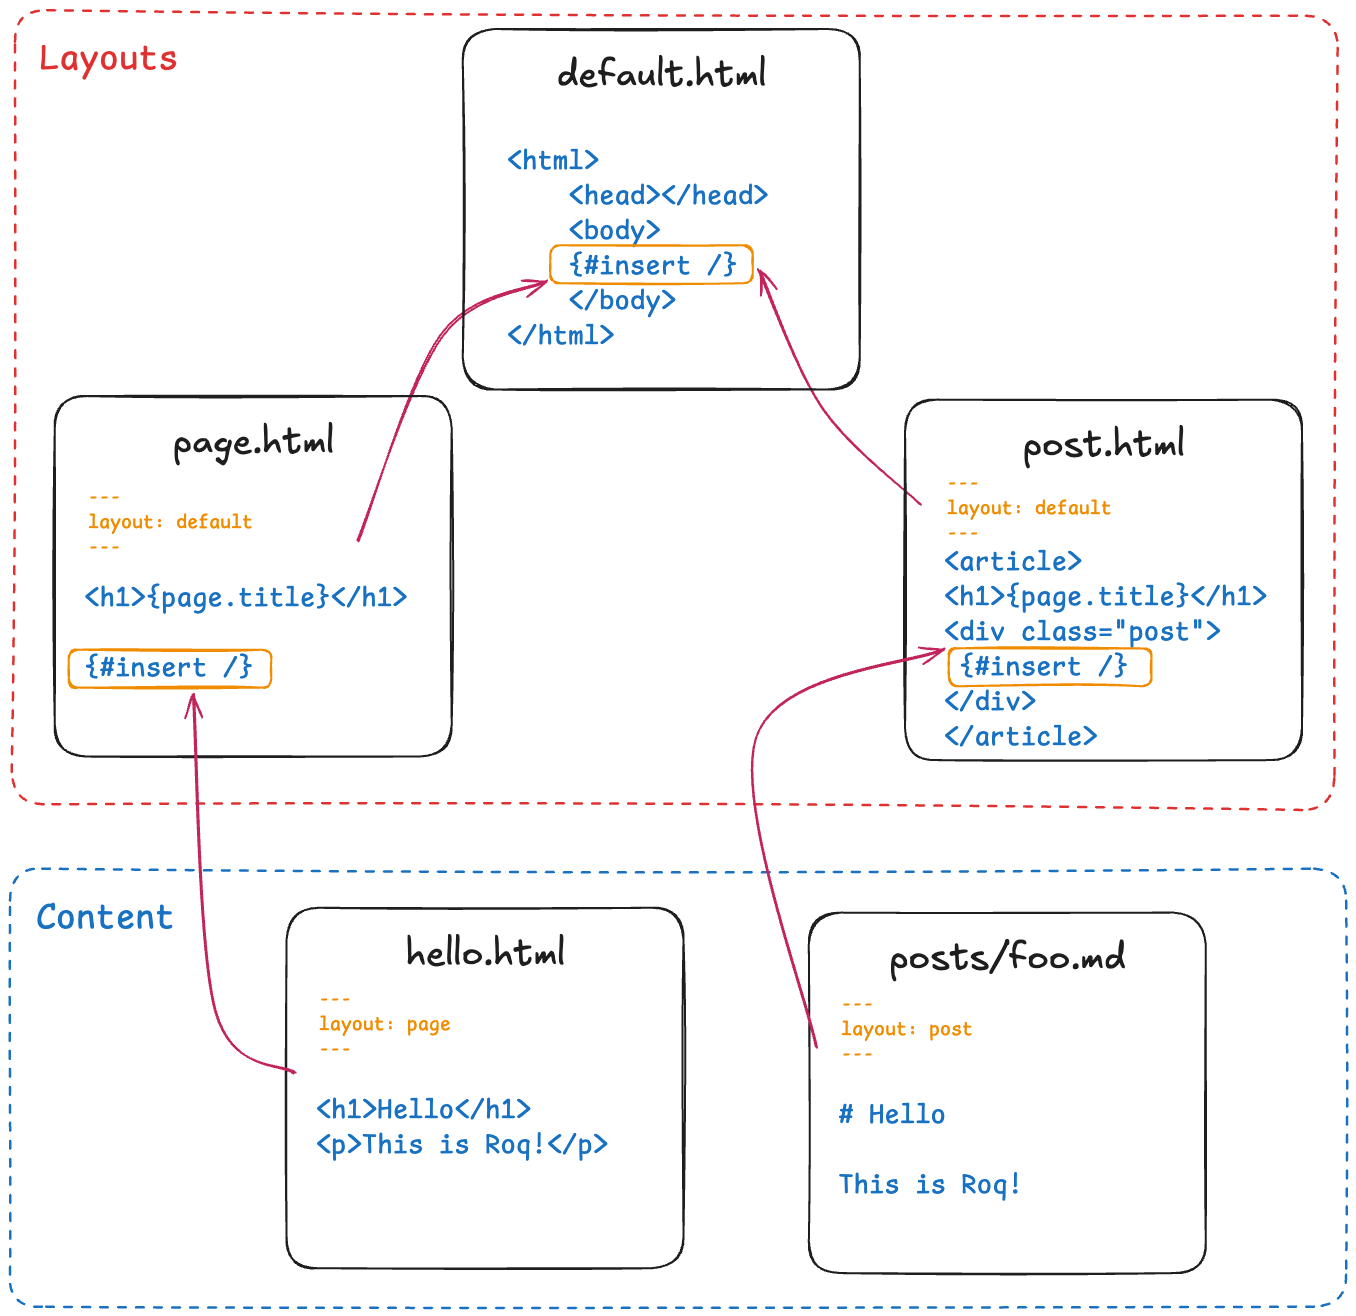
Layouts
For your site, you will have one or more kind of pages, this is what we call "layouts", located by default in templates/layouts/. For example:
-
main: the base layout for all kind of pages -
page: the layout of normal pages -
post: the layout for blog posts -
recipe: the layout for recipes or whatever
A layout may be specified in pages through the layout FrontMatter key (e.g., layout: page). By default (if the content of the file is not a full HTML page — i.e., it does not contain a <html> tag or <!DOCTYPE declaration), posts will use the post layout and normal pages will use the page layout. This can be configured through site configuration.
Roq layouts are using the Qute include section under the hood to achieve template inheritance. For more details, see the Qute documentation on includes: Qute includes. Unlike partials, layouts can also define Frontmatter data, which is inherited along with the template structure.
|
| if you don’t already have layouts and partials in your project, Install a theme or create your own templates (example templates). |
How to create a layout page
If you’re using a theme, you can take advantage of its layouts, but you’re also free to add your own. Layouts are built on a powerful inheritance system, allowing flexibility and customization.
| When using a theme, you can create new layouts that extend the existing theme layouts or partially override them to better suit your needs. Learn more here: Overriding Theme. |
In this sample we will create a simple 3 steps inheritance layout. All below files should be located in the templates/layouts/ directory.
To do so, you will first need a default.html file as followed:
<!DOCTYPE html>
<html lang="en">
<head>
    <meta charset="UTF-8">
    <meta name="viewport" content="width=device-width, initial-scale=1.0">
    <title>{page.title}</title> (1)
</head>
<body>
    {#insert /} (2)
</body>
</html>| 1 | Use the title page attribute that will be defined by the using page |
| 2 | Allows to insert arbitrary content from the page using the layout. |
Then you can create a main.html file as followed:
---
layout: default (1)
title: And now for something completely different (2)
---
<header> Head </header>
{#insert /}
<footer> Toes </footer>| 1 | Uses the default layout. |
| 2 | Defines a default title attribute value for all it’s child. |
Finally, you can create a content.html file as followed:
---
layout: main (1)
---
{#include partials/image /} (2)
knees| 1 | Uses the main layout. |
| 2 | Includes a partial template. |
Then it will be rendered as followed:
<!DOCTYPE html>
<html lang="en">
<head>
    <meta charset="UTF-8">
    <meta name="viewport" content="width=device-width, initial-scale=1.0">
    <title>And now for something completely different</title>
</head>
<body>
    <header> Head </header>
        <img src="https://supersimple.com/wp-content/uploads/head-shoulders-knees-and-toes-flashcards-726x1024.png" alt="Illustration" />
        knees
    <footer> toes </footer>
</body>
</html>
To summarize, each page will be rendered using their parent layout recursively. The inheritance system works for the page content as mush as for the FrontMatter data.
Partials
You can split layouts into partial, reusable templates.
Partials make it easier to maintain different sections of your layouts. By default, they are located in templates/partials/.
For example:
➡️ templates/partials/pagination.html
can be included using: {#include partials/pagination /}
Tags
Tags (User Tags) are custom reusable snippets of code, similar to small components. They help reduce duplication and let you create reusable sections.
For example, create a tag in templates/partials/post-link.html:
{@io.quarkiverse.roq.frontmatter.runtime.model.DocumentPage post}
<div class="post-link">
    <a href="{post.url}">
      <img src="{post.image}" alt="{post.title}" class="post-image"/>
      <h3>{post.title}</h3>
      <p>{post.description}</p>
    </a>
</div>
You can then use it in another template like this :
{#post-link post=site.document('posts/2025-09-08-my-article.md')/}This would render a styled card linking to the given DocumentPage post.
|
You can reference pages and documents by their source path. For example:
|
To learn more, see the Qute User Tags guide.
Install a theme
To install a theme, simply add the dependency to your pom.xml. Example with Roq’s default theme:
<dependency>
    <groupId>io.quarkiverse.roq</groupId>
    <artifactId>quarkus-roq-theme-default</artifactId>
    <version>{cdi:project-info.release.current-version}</version>
</dependency>
It will provide templates, scripts and styles for your site. To use a theme layout, refer to it with :theme/ prefix (there is an example in the next part). For advanced usage, refer to the Theme section.
Site index
Your site index page is required and should be located in content/index.html (you can also use a markup extension).
---

title: Hello Roqers (1)
description: It is time to start Roqing 🎸!
layout: :theme/index (2)

---

<h1>Hello fellow Roqers 🤘</h1>

<p>
  With Roq, it is very easy to a link to another.
  <a href="{site.url('/roq-page')}">page</a>. (3)
</p>| 1 | The index.html also describe your site information through a FrontMatter header. |
| 2 | The layout to use (in this case :theme/index which refers to the index layout from the theme). |
| 3 | We use the {site.url(path)} using Qute to manual resolve other pages urls. |
| There are different ways to link your pages as explained in the Links & Urls section. |
Variables
You can use Qute to access site and pages data. For this use the site and page variables:
-
The
site(javadoc) variable allow to access site global info from any page, document, layout or partial.Show attributes
Variable Type Description Example site.urlRoqUrlThe Roq site URL
site.dataJsonObjectThe site FM data (declared in the index.html)
{"title": "My Site", "description": "A description"}site.pagesjava.util.List<NormalPage>All the pages in this site (without the documents)
[Page1, Page2, Page3]site.collectionsRoqCollectionsAll the collections in this site (containing documents)
{"collection1": Collection1, "collection2": Collection2}site.titleStringThe site title
My Sitesite.descriptionStringThe site description
A descriptionsite.imageRoqUrlThe cover image URL of the page with disk check
site.image(String relativePath)RoqUrlThe image from the public images directory with disk check
site.image('foo.jpg') ⇒ http://example.com/images/foo.jpgsite.file(String relativePath)RoqUrlThe file from the public directory with disk check
site.file('foo.pdf') ⇒ http://example.com/foo.pdfsite.url(String path, String… others)RoqUrlShortcut for site.url.resolve(path)
site.url("/about") ⇒ http://example.com/my-roq-site/aboutsite.page(String sourcePath)PageGet a page or document page by source path (e.g. pages/first-page.html)
site.page('foo.html').url.absolute ⇒ http://example.com/the-foo-page -
The
page(javadoc) variable is available in pages, documents, layouts, and partials. It contains the info for the page it is used from.Show attributes
Variable Type Description Example page.urlRoqUrlThe URL to this page
page.sourceOriginThe page source (file name, …)
page.dataJsonObjectThe FM data of this page
{"title": "About Us", "description": "This is the about us page."}page.paginatorPaginatorThe paginator if any
Paginator{currentPage=1, totalPages=5}page.collectionStringThe collection id if this a document
postspage.titleStringThe title of the page (shortcut from FM)
About Uspage.descriptionStringThe description of the page (shortcut from FM)
This is the about us page.page.imageRoqUrlThe cover image URL of the page with disk check
page.image(String relativePath)RoqUrlThe image from the attached files (for index pages) or from the public image directory with disk check (for other pages)
page.image('foo.jpg') ⇒ http://example.com/foo-page/foo.jpgsite.file(String relativePath)RoqUrlThe file from the attached files with disk check
page.file('foo.pdf') ⇒ http://example.com/foo-page/foo.pdfpage.dateZonedDateTimeThe publication date of the page or null
2023-10-01T12:00:00Z
Pages
Any content template file without the _ prefix in the site content/ directory (and subdirectories) will be scanned as pages.
Let’s create your first page and spice things up a bit by using Markdown (included by default with Roq).
---

title: Roq Bottom
description: When you hit Roq bottom, try Roq to climb back up!
layout: :theme/page
link: /climb-back-up (1)
the-rope: You Roq! (2)

---

# Roq Bottom

If you thought you hit Roq Bottom, take this 🪢 because :

__{page.data.the-rope}!__ (3)| 1 | you can use link to give this page a custom link (by default it will use the file-name). |
| 2 | you can add other FM data. |
| 3 | FM data is available through page.data. |
Markup languages
You can use different markup languages in Roq content.
Markdown
Roq ships with Markdown support out of the box (powered by commonmark-java).
To write pages or documents in Markdown, simply use the .md or .markdown file extension.
This plugin also allows converting Qute data that contains Markdown
into HTML using the mdToHtml template extension.
---
bar: |
    ## Hello

    This is using **Markdown**
---

{page.data.foo.mdToHtml}|
If you don’t need Markdown, you can disable it by excluding the Markdown plugin from the Roq extension in your |
AsciiDoc
AsciiDoc is also fully supported in Roq via the AsciiDoc plugin.
Once installed, to write pages or documents in AsciiDoc, simply use the .adoc or .asciidoc file extension.
Global data
It is possible to declare global data as yaml or json in data/ directory.
For example:
bar: RoqCan be access with {cdi:foo.bar} in any template.
You can also have a structure (Java type mapping) for the data amongs other feature, learn more.
Template Extensions
The Qute templating language supports a concept called template extension methods. These methods allow us to add functional to types and expose it in our templates. Moving logic from the template to Java code gives us the ability to use a more robust language for more complex logic and makes the functionality more easily reusable,as well as keeping our templates clean:
-
Qute provides built-in template extensions
-
Roq has several built-in template extensions (javadoc):
| Usage in a Qute template | Description |
|---|---|
|
Returns the number of words in the string |
|
Returns the text limited to |
|
Returns a slugified version of the text |
|
Returns the HTML content limited to |
|
Returns the text with all HTML tags removed |
|
Returns the estimated reading time in minutes for the page content |
|
Returns the first 75 words of the page content |
|
Returns the page content limited to |
|
Returns the list in random order |
|
Returns a list of JsonObject. All items must be JSON objects. |
|
Returns the collection for the given key |
|
Returns only documents matching the front-matter key/value |
|
Returns only documents dated in the future |
|
Returns only documents dated in the past |
|
Sorts documents by a front-matter key (string), optionally reversed |
|
Sorts documents by date, optionally reversed |
|
Normalizes a front-matter field into a list of strings |
|
Returns the MIME type based on the file name extension |
You can provide your own template extensions by adding a class to your projects src/main/java directory and annotating either class or the public static method with @TemplateExtension:
public class Extensions {
    @TemplateExtension
    public static String doSomething(String text) {
        // ....
    }
}
and then you can use that extension in your template:
{site.pageContent(page).doSomething}Collections
Collections are a great way to group related content such as blog posts, recipes, member of a team or talks at a conference. Once created you can easily iterate and link to them.
By default, Roq is configured with a posts collection using the content/posts directory. Let’s create our first post:
---

title: Roq bad puns
description: Roq is very good for bad puns 🤭
layout: :theme/post (1)
tags: (2)
  - funny
  - ai
img: 2024/10/roq-solid.jpg

---

# {page.title} (3)

Here is a list of puns suggested by Chat GPT:
1.	Roq and Rule – A play on “rock and roll,” implying dominance or success.
2.	Between a Roq and a Hard Place – Classic pun meaning stuck in a difficult situation.
3.	Roq Solid – Something that is extremely reliable or stable.
4.	You Roq! – A compliment, suggesting someone is awesome or does something well.
5.	Roq Bottom – Referring to the lowest possible point, often used metaphorically.
6.	Roq the Boat – To cause trouble or disturb the status quo.
7.	Roq Star – A person who excels or stands out in their field.
8.	Let’s Roq – Slang for getting started or doing something exciting.
9.	Roq On! – An enthusiastic way to say “keep going” or “stay awesome.”
10.	Roqy Road – Could be literal (the type of road) or metaphorical for a difficult journey.
11.	Roq of Ages – A historical reference, often implying something long-standing and unchanging.
12.	Roq the Cradle – Can be literal or a pun about nurturing or starting something new.
13.	Roqy Relationship – A tumultuous or unstable relationship.
14.	Heavy as a Roq – Something burdensome or difficult to manage.
15. Stone Cold Roq – Referring to something very cool or emotionless.| 1 | This time we use the post layout from the theme. |
| 2 | You can define tags (see Plugins to create pages for tags). |
| 3 | You have shortcut on the page to access title and description. |
Ok, to dive a bit deeper, we could create a json listing all posts with some info:
[
{#for post in site.collections.posts} (1)
  {
    "title": "{post.title}",
    "url": "{post.url.absolute}", (2)
    "image": "{post.image.absolute}", (3)
    "date": "{post.date}", (4)
    "read-time": "{post.readTime}" (5)
  }{#if !post_isLast},{/if}
{/for}
]| 1 | You can use site.collections.[collection id] to access the full list of documents (it is also possible to paginate). |
| 2 | post.image is smart and is already resolved to the image url (as a RoqUrl), absolute to get the absolute url. |
| 3 | post.url contains the post url (as a RoqUrl), you could also use absolute to get the absolute url. |
| 4 | post.date returns a ZonedDateTime and can be formatted the way you want. |
| 5 | post.readTime is a Qute template extension which compute the read time based on the post content. |
Draft and Future
To create a draft page or document, you can use the frontmatter field draft: true. Drafts won’t be visible when published unless you set %dev.site.draft=true in your Quarkus configuration (the %dev makes it apply only in dev mode).
You can also place draft documents (for collections) in a drafts/ (e.g. posts/drafts/) directory.
You may also start quarkus with the option: quarkus dev -Dsite.draft.
|
By default, documents with a date in the future (FrontMatter data or file name) will not be visible unless you have %dev.site.future=true in your Quarkus configuration (the `%dev`makes it only available in dev-mode).
You may also start quarkus with the option: quarkus dev -Dsite.future.
|
It is possible to configure a collection to always show future documents:
site.collections.events.future=true (1)| 1 | Always show future documents for the "events" collection. |
How to create custom collections?
You can easily create your own collection, such as documentation, recipes, team members, or conference talks. To do this, simply create a new folder under the content directory. For example, if you’re adding docs, it would look like this:
content/
├── docs
│   ├── 01-chap
│   │   ├── image1.png
│   │   └── index.adoc
│   ├── 02-chap
│   │   ├── image2.png
│   │   ├── index.adoc
└── posts
    └── 2025-01-02-my-first-blog
        └── index.md
In this example, we have two collections: posts and docs. Finally, you need to define the new collection in the config/application.properties (or src/main/resources/application.properties) file using the following properties:
site.collections.docs=true (1)
site.collections.docs.layout=":theme/post" (2)
site.collections.docs.future=true (3)

site.collections.posts=true
site.collections.posts.layout=":theme/post"| 1 | We are adding the new collection docs; |
| 2 | Here, we are declaring the docs layout; |
| 3 | Finally, since the new collection is not a time-based collection, we need to set future as true to show all files. |
Since we’re adding a new collection, it’s also necessary to declare the existing posts collection to ensure it continues to function correctly.
|
Now, we can access all the new collection docs data as follows:
{#for doc in site.collections.docs}
- [{doc.title}]({doc.url})
{/for}
Since the new collection is also a normal page, we can use all variables described in the variable section.
Site static files
Site static files are served as-is without any additional processing. By default, all files in public/ are scanned as static files.
public/
├── images/image.jpg (1)
├── scripts/script (2).js (2)
└── presentation.pdf (3)| 1 | generated as on /images/image.js |
| 2 | generated as /scripts/script-2.js(slugified 👇) |
| 3 | generated as /presentation.pdf |
Site static files url can be accessed through site.file('presentation.pdf') or site.file('scripts/script (2).js') or just their relative paths.
site.file(path) also checks that the file exists on disk and will adapt on site configuration (e.g. root path change).
|
To improve SEO, all static files are slugified, Roq replaces non-URL-friendly characters with -. URL-friendly characters are alphanumeric, -, and _ (multiple dots are also tolerated for files). Using site.file and page.file variables automatically applies this replacement on returned url (same for images). To disable this behavior, set site.slugify-files=false in Roq’s configuration.
Page attached static files
Pages may have attached static files (image, pdf, slides, …). For this, instead of creating a file page, create a directory with an index page:
content/my-page/
        ├── image.jpg (1)
        ├── slide.pdf (1)
└── index.md (2)| 1 | Every non page files in the directory will be attached to the page. |
| 2 | Use an index.(html,md,…) for the page content; |
| this also works in collections. |
In that case, those attached files will be served under the same path as the page and can be accessed via a relative link:
[slide](./slide.pdf)The resulting link for a page can be different from its directory name, attached files will be relative to the resulting link. This way it works both in IDEs preview and in the browser.
Let’s imagine for a minute that the page link is https://my-site.org/awesome-page/, then the slide will be served on https://my-site.org/awesome-page/slide.pdf.
You can use {page.file("slide.pdf")} to resolve the file url and check that the file exists. This is also useful in other cases, for example from another page (e.g. {site.page("my-page/index.md").file("slide.pdf")}) or if you want the absolute url (e.g. {page.file("slide.pdf").absolute}):
If you want to iterate over page files, they can be listed using {page.files}.
|
Images
Site images
The site images should be added in the public image directory (e.g. my-site/public/images/image-1.png).
The default public path prefix for images is images/ (this can be changed in the site configuration).
Url can be accessed using the site variable as shown in this example: <img src="{site.image('image-1.png')}" />.
The image method is a convenience and is equivalent to using <img src="{site.file('images/image-1.png')}" />.
|
Page images
When using pages as directories (such as posts/surf/index.html), {page.image(name)} checks if the file is attached to the given page and return its url.
In other pages (such as posts/basketball.md), {page.image(name)} will act the same as site.image(name) and resolve from the site image directory.
Let’s take this example structure:
my-site/
├── content/
│   └── posts/
|       └── basketball-article.md               (1)
│       └── surf-article/
            ├── cover.jpg
│           ├── surf.jpg                (2)
│           └── index.html
└── public/
    └── images/                         (3)
        ├── basketball-cover.png
        ├── basketball.png
└── football.jpg| 1 | With non directory pages, page.image() is equivalent to site.image(). |
| 2 | Accessible via page.image('surf.jpg') or via a simple relative link only from the index page. |
| 3 | Accessible via site.image('basketball.png') on all pages. |
Here is how to access those images from the article:
---
image: cover.jpg
---
<h2>👍</h2>
<img src="surf.jpg" /> (1)
<img src="{page.image()}" /> (2)
<img src="{page.image('surf.jpg')}" /> (3)
<img src="{site.image('basketball.jpg')}" /> (4)
<img src="{site.image('basketball.png').absolute}" /> (5)

<h2>👎</h2>
<img src="{site.image('surf.jpg')}" /> (6)
<img src="{page.image('soccer.jpg')}" /> (6)
<img src="{page.image('basketball.jpg')}" /> (6)| 1 | Relative links are working when using Page attached static files. |
| 2 | Will show the page cover image (same as {page.image('cover.png')}) |
| 3 | surf.jpg is also attached to this page |
| 4 | site.image(path) looks into /public/images/ by default (with disk checking). |
| 5 | render the absolute url (e.g. https://my-site.org/images/basketball.png) |
| 6 | this would throw an error! |
Page & Site cover image
Page cover image is referenced in the page FM image data.
---
image: my-page.png
---

{page.image}
The url can be accessed from this template (and its parent layouts) through {page.image}.
---
image: my-site.png
---
It can be accessed in any template through {site.image}.
Styles and Javascript
Here are two options to consume scripts and styles:
-
Add css and scripts in your site static directory, see Site static files section.
-
Use the Quarkus Web Bundler to bundle your script and styles 👇.
| The Quarkus Web Bundler is included by default in Roq. |
To use bundling scripts (js, ts) and styles (css, scss), locate them in src/main/resources/web/app/.
my-site/
├── src/main/resources/web/app/
│                           ├── scripts.js
│                           └── styles.scss
To include the generated bundle in your template, specify the bundle tag in the html>head tag:
<head>
  ...
  {#bundle /}
</head>
It will be rendered with the relevant <script> and <style> tags to include your bundle.
| You may also consume and bundle npm dependencies among other cool things. For more info, read the Quarkus Web Bundler documentation. |